title: "Unleash the Power of LLMs: Local Deployment with Docker, Huggingface, and Gradio"
source: "https://georgedittmar.medium.com/unleash-the-power-of-llms-local-deployment-with-docker-huggingface-and-gradio-9e0482822acc"
author:
  - "[[George Dittmar]]"
published: 2024-03-03
created: 2025-02-02
description: "LLMs have been all the rage in the past year, with systems and models like ChatGPT and LLama2 becoming nearly household names. As more and more people seek to utilize them, there is a growing demand…"
tags:
  - "clippings"
Unleash the Power of LLMs: Local Deployment with Docker, Huggingface, and Gradio
[

LLMs have been all the rage in the past year, with systems and models like ChatGPT and LLama2 becoming nearly household names. As more and more people seek to utilize them, there is a growing demand for methods to run them on local hardware to cater to custom needs.
Several excellent solutions for running LLMs on local hardware exists, such as Ollama and Lama.cpp just to name a few. These tools are relatively user-friendly and require minimal technical expertise to run. Most of them offer straightforward installation processes and can abstract away the more technical aspects involved in loading and running the model.
However, these solutions may not always be suitable for every requirement or environment you need to deploy into. In some cases, you may need to delve deeper into serving and deploying LLMs using tools and frameworks commonly found in enterprise environments. You may also have private data you do not want to run through an LLM provider that could be keeping track of your prompts and responses. This is where knowing how to deploy your own LLM on local hardware comes in handy. For this tutorial we shall focus on running on a local machine such as a gaming PC and spin up a bare bones ChatGPT like stack.
Requirements
- Linux or WSL (Haven’t tested on Docker in Windows yet)
- GPU (I am using RTX 3080 10GB)
- CUDA
- Docker
- Python
The Code Repo
The Local-LLM repository is a basic Docker setup that contains the components you need to start up an LLM and UI that you can interact with.
Docker
Everything is run via containers which allow for easier deployment and portability. The basic flow of communication between these containers is shown below.
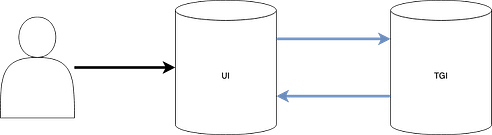
Diagram of Docker containers and how they communicate with each other
Let’s take a quick look at the docker-compose file. We define two services in the file called TGI and one called UI.
TGI Service
The TGI container handles model serving through Huggingface’s Text Generation Inference framework. It provides a straightforward method to serve LLMs hosted on Huggingface with quantization support, simplified model loading, and extensive control over serving configurations. Read more at https://huggingface.co/docs/text-generation-inference/index. It can be used as either a python API, or as a docker image that Huggingface provides.
The TGI service requires environment variables to be set to start up the service. For simplicity the repo has these variables stored in a .env file, which docker-compose will load automatically for us. Here is the default file from the repository with some values predefined. These can be modified to use a different model or use other token values depending on the machine you want to run it on.
LOCAL_MODEL_CACHE_DIR=
LLAMA_TOKEN=
MODEL_ID=mistralai/Mistral-7B-Instruct-v0.2
QUANTIZATION=bitsandbytes-nf4
MAX_PREFILL_TOKENS=3072
MAX_TOTAL_TOKENS=4098
MAX_INPUT_LENGTH=3000
One important variable to note is the LLAMA_TOKEN variable. You only need to set this if you intend to use any of the LLama2 models hosted on Hugging Face. Otherwise, you can leave this variable blank and use another model, such as Mistral which is defined by default. We also set the QUANTIZATION variable to use bitsandbytes-nf4 to run on smaller GPUs, but again these can be set however you need.
UI Service
The other container operates the UI component of our LLM stack. The container runs a Python script which uses Gradio and Langchain. Let's take a quick look at the code.
We use Langchain to help manage the calls to the TGI service and Gradio to give us a UI input we can interact with. We utilize Langchain’s LCEL syntax to set up the chain that talks to the TGI service. The base prompt that is supplied in the script can be modified but as is allows for simple question answering and text generation tasks. The response from the TGI service is then streamed back to the client via the stream_response function. Gradio has a ChatInterface class which gives a simple ChatGPT like UI which can read the stream_response function and render the response token by token.
Running Locally
Once you have the repository pulled down onto your machine you can run the following make commands to setup and deploy the Local-LLM stack on your machine.
First, run **make build** to build the containers and pull down the Huggingface TGI base image. You should only need to do this step once, or whenever you update one of the service containers with new code or versions.
Next, after building the containers, run **make start**. This will spin up the containers on your host machine and can take a few minutes if it needs to download model files etc.
Then, you can run **make logs**to view the service logs to make sure things are starting up correctly. You can also view them via Docker Desktop if you prefer that interface to command line.
You should see startup text from the TGI container, followed by the UI container logs. There may be some warnings related to Langchain, but they don't affect whether the UI spins up or not. After a minute or two, the UI should be up, while the TGI container may still be downloading the required model files. Once that's done, you should see the following in the logs which will let you know that everything is ready to go!
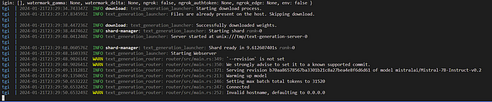
logs to see when everything is ready to go
Now if we go to http://localhost:7000 and we should see this:
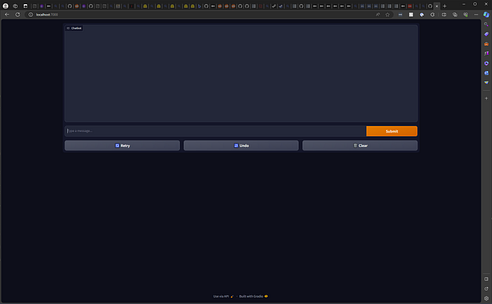
We now have a complete LLM stack setup and running enabling conversation with the model! Below is a sample output querying a solution to the Two Sum problem from Leetcode.

From here, you can customize the UI and Langchain logic to suit your use cases or just experiment with different models! This setup again is very basic but shows how you can use standard tools such as Docker, Huggingface, and Gradio to build and deploy a fullstack LLM application on your own machine or other environments. From here you can expand in nearly any direction you want using LLMs!
Feedback or questions on this tutorial are welcome. I would love to hear from you!